Quantcast
Channel: Infragistics Community
Viewing all 2460 articles
Browse latest View live

Infragistics WPF Release Notes – April: 14.1 Service Release

$
0
0

Release notes reflect the state of resolved bugs and new additions from the previous release. You will find these notes useful to help determine the resolution of existing issues from a past release and as a means of determining where to test your applications when upgrading from one version to the next.

Release notes are available in both PDF and Excel formats. The PDF summarizes the changes to this release along with a listing of each item. The Excel sheet includes each change item and makes it easy for you to sort, filter and otherwise manipulate the data to your liking.

In order to download release notes, use the following links:

Infragistics WPF 2014 Volume 1 Service Release

PDF - Infragistics WPF 2014 Volume 1 (Build 14.1.20141.2027)
Excel - Infragistics WPF 2014 Volume 1 (Build 14.1.20141.2027)


Ignite UI Release Notes - April 2014: 14.1 Service Release

$
0
0

With every release comes a set of release notes that reflects the state of resolved bugs and new additions from the previous release. You’ll find the notes useful to help determine the resolution of existing issues from a past release and as a means of determining where to test your applications when upgrading from one version to the next.

Release notes are available in both PDF and Excel formats. The PDF summarizes the changes to this release along with a listing of each item. The Excel sheet includes each change item and makes it easy for you to sort, filter and otherwise manipulate the data to your liking.

Download the Release Notes

Ignite UI 2014 Volume 1

Infragistics Silverlight Release Notes – April: 14.1 Volume Release

$
0
0

Release notes reflect the state of resolved bugs and new additions from the previous release. You will find these notes useful to help determine the resolution of existing issues from a past release and as a means of determining where to test your applications when upgrading from one version to the next.

Release notes are available in both PDF and Excel formats. The PDF summarizes the changes to this release along with a listing of each item. The Excel sheet includes each change item and makes it easy for you to sort, filter and otherwise manipulate the data to your liking.

Download the Release Notes

Infragistics WPF Release Notes – April: 14.1 Volume Release

$
0
0

Release notes reflect the state of resolved bugs and new additions from the previous release. You will find these notes useful to help determine the resolution of existing issues from a past release and as a means of determining where to test your applications when upgrading from one version to the next.

Release notes are available in both PDF and Excel formats. The PDF summarizes the changes to this release along with a listing of each item. The Excel sheet includes each change item and makes it easy for you to sort, filter and otherwise manipulate the data to your liking.

Download the Release Notes

Webinar: Simplify Your Design Process with Indigo Screenparts

$
0
0

Indigo Studio already makes it easy for you to quickly create functional, animated UI prototypes while maintaining the focus on user experience at every step -- all with no coding necessary! Now, Indigo is even better, thanks to screenparts. Learn all about this new feature in our recent webinar.

[youtube] width="420" height="315" src="http://www.youtube.com/embed/ThRvIBcYBGI" [/youtube]

In this video, interaction Design Manager George Abraham walks you through Indigo Studio and all the exciting new things you can do with screenparts, including:

  • creating re-usable custom buttons and interactive widgets;
  • adding interactions and user flows inside each screenpart;
  • sharing your screenparts with your team members; and more.

For more videos like this one, be sure to subscribe to our YouTube channel.

Give your project a head start with the Infragistics Template Gallery

$
0
0

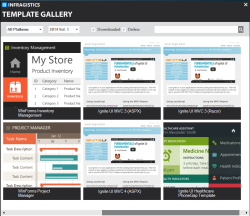
Infragistics Template Gallery header image

If you have been following the news around our 14.1 release a major focus this cycle was on developer productivity. In the current blog we are going to focus on the new Visual Studio Starter Kit Template Gallery.

The main idea behind the Infragistics template gallery is to provide easy to use project templates to developers.In the gallery you will find project templates mostly based on different on app samples for ASP.NET, WinForms and Ignite UI ASP.NET MVC. These templates are real world applications that can be easily adjusted to your needs. What motivated us to create such templates is that we want you to write less code and easily establish beautiful, functional, user friendly and fully-styled applications.

Among the current template you will find the ASP.NET Energy Dashboard sample,Ignite UI Healthcare PhoneGap app as well as WinForms samples such as Inventory Management, Project Manager and Outlook CRM. Over time we will create and add more templates to address a wide range of application scenarios.

What you need to know

The Infragistics template gallery is a beautifully designed visual studio extension and can be downloaded with the installer from our main page. When you run the platform installer you will find the tools listed at the end of the of the selectable products. Don’t forget to check the Visual Studio Template Gallery. Pay attention that this tool is supported only for Visual Studio 2012 and above.

Infragistics Installer

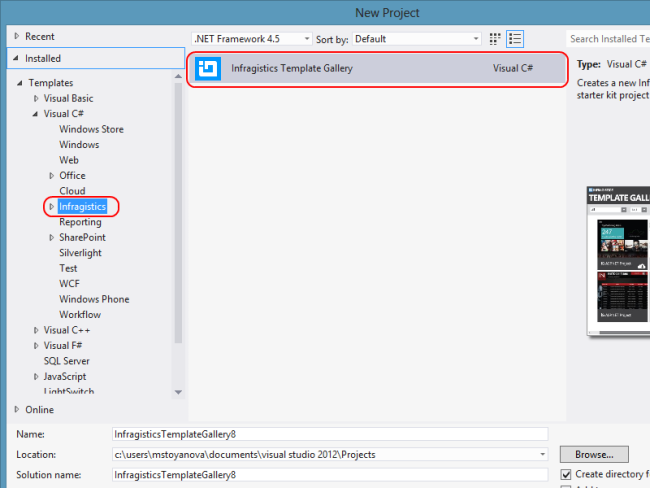
After you have installed the Infragistics Template Gallery, you can find the tool in the File->New Project dialog of Visual Studio as a Project template under the Infragistics category.

Visual Studio Infragistics Template Gallery

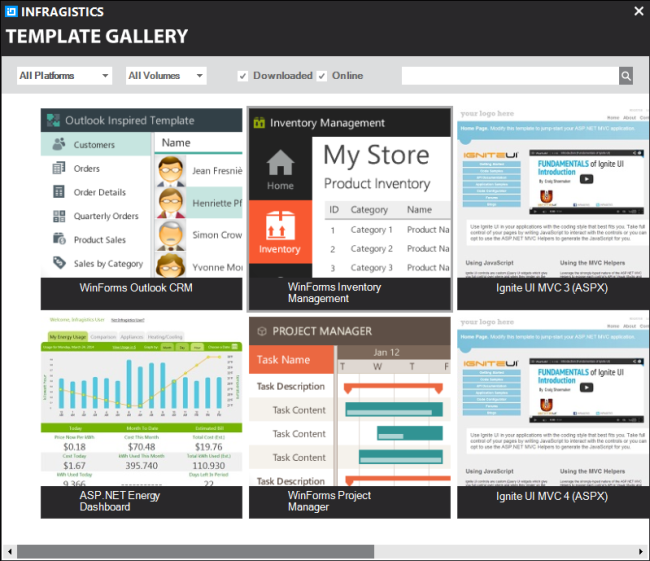
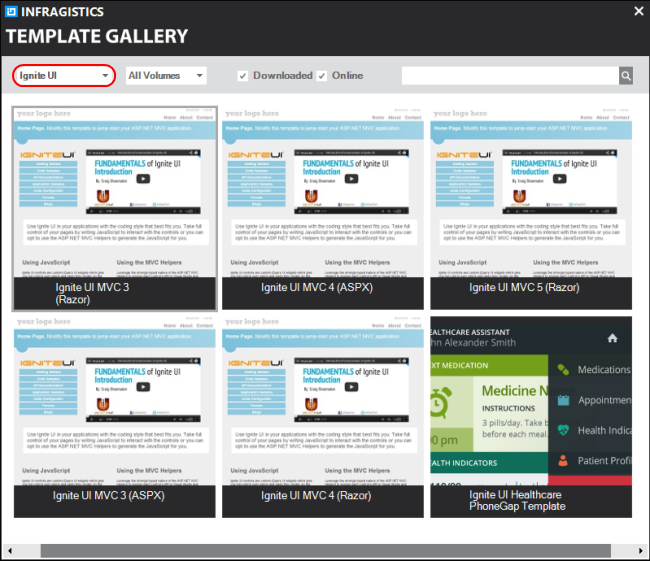
The selection of this Infragistics template will open a wizard which contains all of our available project templates. As we mentioned in the beginning of the article, most of them are based on existing application samples. You simply click on one of the templates in order to download it and start a new project with it.

Infragistics Template Gallery Wizard

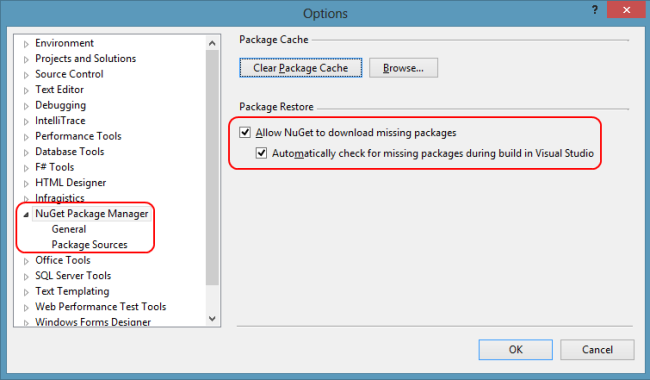
As I said you can choose a template for your ASP.NET, MVC or WinForms project. No matter which template you choose you should be on the alert that your NuGet package should be a recent version and you should have the Package restore in the Tools->Options->NuGet Package Manager enabled. If the options in the dialog are not checked – check them and restart your Visual Studio, so that the changes will be applied. That way you will have the missing NuGet packages automatically restored during build time.

Visual Studio option for restoring missing packages

In the Template Gallery wizard you can see that at the beginning all of the templates are online, but after you have chosen one of them it will be downloaded. You can find all of the downloaded templates listed in the File->New Project dialog of Visual Studio under the Infragistics category. That way when you want to use these templates again they will be more easily accessible. Another place where you can find the installed templates is in the Tools->Extensions and Updates dialog in Visual Studio. We will be publishing the project templates into the official Visual Studio gallery so if a new version of the template come out you will be notified and you can update it from either this dialog or our installer. As the templates can be downloaded separately from the wizard they can as well be updated separately. That means they are not tied to the release cycle and you can get new versions as soon as they are available.

Ignite UI ASP.NET MVC razor templates

To use any of the Ignite UI MVC razor template there are two requirements that you need to fulfill. First you need the Ignite UI product installed. You can download a free trial from our main page :  www.infragistics.com. The second thing is that you should ensure that the Infragistics.Web.Mvc assembly (DLL) reference is updated to the current version. If you want to update the version number, you should remove the assembly reference and re-add it from the Global Assembly Cache (GAC). You should also set the Infragistics.Web.Mvc.dll property Copy Local to true in the project that you’ve created from the template.

Don’t worry if you haven’t done any of these steps and an error occurs when you run the project you will see a helpful guidance  notifying you of the possible issues.

Ignite UI templates in the wizard

ASP.NET template

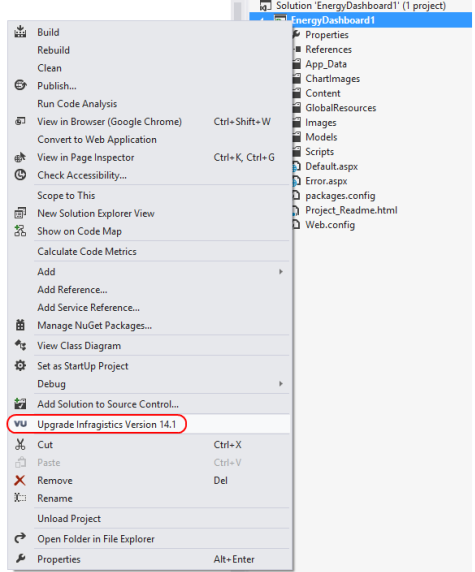
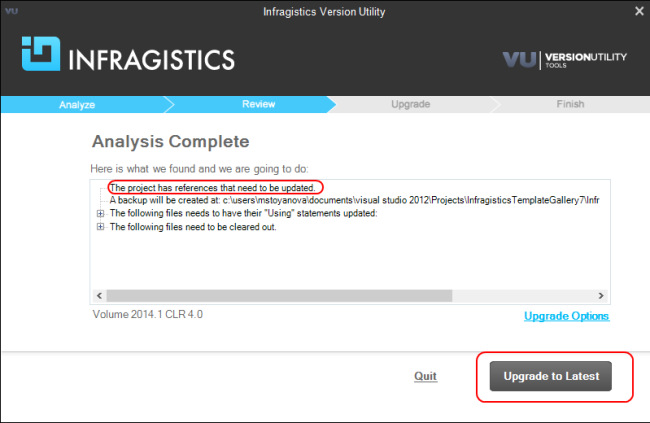
The ASP.NET Energy Dashboard is a great example for a real-world application. The thing to watch out for here is whether the version of the the assemblies added in the templates differ from those that you downloaded with your package an error will occur. That can be easily fixed. In the installer platform at the tools section you can see the Version Utility tool. After you have it installed you just have to Upgrade the Infragistics version for your project. Another way to fix this problem is to change the version number manually. Go to the web.config file and find the assemblies  and controls tags and change the version of the Infragistics DLLs there to the correct one.

Upgrade Infragistics Version

Version Utility

Summary

Having a ready to use templates saves time and allows you to create stunning application while writing less code.  In the new 14.1 release of Infragistics you can find a template gallery with different easy to use fully-styled application samples for ASP.NET, Ignite UI ASP.NET MVC as well as WinForms. This starter kit  gives you the opportunity to build real-world apps – so just add your content to the template and let the magic happen.


You can follow us on Twitter @Infragistics and stay in touch on Facebook, Google+ and LinkedIn!

NucliOS Release Notes - May: 13.2.171, 14.1.111 Service Release

$
0
0

Introduction

With every release comes a set of release notes that reflects the state of resolved bugs and new additions from the previous release. You’ll find the notes useful to help determine the resolution of existing issues from a past release and as a means of determining where to test your applications when upgrading from one version to the next.

Release Notes: NucliOS 2013 Volume 2 Build 171 and NucliOS 2014 Volume 1 Build 111

ComponentProduct ImpactDescriptionService Release
IGCalendarViewBug Fix

Larger font makes day numbers unreadable.

Note: N/A

13.2.171, 14.1.111
IGChartViewBug Fix

Lines are incorrect plotted on 64-bit device.

Note: Scatter point order fixed for 64-bit devices.

13.2.171, 14.1.111
IGChartViewBug Fix

EXC_BAD_ACCESS exception on a long press when .markerType = IGMarkerTypeNone.

Note: Crash fixed when showing tooltip on a scatter series that has no markers.

13.2.171, 14.1.111
IGChartViewBug Fix

Series are not drawn in the order they are added to the chart.

Note: Series internal sort order fixed for stacked series.

13.2.171, 14.1.111
IGChartViewBug Fix

Custom markers aren't removed when series is removed.

Note: Custom markers are now removed when a series is removed.

13.2.171, 14.1.111
IGSlideTabViewBug Fix

Delegate methods of the IGSlideTabDelegate not as Apple-ish as they could be.

Note: The IGSlideTabDelegate methods are now in line with Apple standards.

14.1.111

By Torrey Betts

iOS - Objective-C - Custom Paging with UIScrollView using the IGGridView

$
0
0
I've said this before, and i'll probably keep saying it, the UIScrollView is very powerful and awesome. Its so powerful that we build our IGGridView control by deriving from it. Even Apple wrote their UITableView the same way. So, today I'm going to show you how you modify the scrolling of the UIScrollView, and thus the IGGridView, so that you have one column always centered in the viewport. Thats including the first and last item. You can download my sample project here . In order to...(read more)

Upcoming Webinar: Making Data Useful

$
0
0

Get ready for our free webinar on May 21st!

[youtube] width="640" height="480" src="http://www.youtube.com/embed/q0eWIa_eXig" [/youtube]

There is a lot of data out there, and everyone claims that it holds the key to business growth, large scale innovation, peace, love and prosperity. But how do you go from data to insight? Let Dr. Kevin Richardson show you how in his webinar.

Hurry, space is limited – reserve your spot today and we’ll see you there!

iOS - Objective-C - Downloading Data using NSURLConnection

$
0
0
In this always connected cloud based world we live in today, i'm willing to bet that the App you're currently working on, needs to download some sort of data. Whether it be files from some type of cloud storage, or even just requesting tweets from twitter. Today i'm going to talk about NSURLConnection and how it can be used to download data. Note:It's not their latest technology by any means, in fact in iOS 7 they introduced NSURLSession which essentially replaces it. However, if...(read more)

What is C#?

$
0
0

What is C#?

C# is an object oriented programming language developed in 2000 by Anders Hejlsberg at Microsoft. Anders has an impeccable heritage in this area, having previously worked on both Turbo Pascal and Delphi. Since creating C#, Anders has moved onto the development of TypeScript, a Microsoft project to create an enhanced version of JavaScript.


The C# language was designed to be platform independent and borrows its syntax heavily from both Java and C++. Indeed one of Anders original design goals was to create a language to address what he saw as many of the flaws in these older languages.


In 2000 O'Reilly editor John Osborn conducted an interview with Anders, in which he discussed the inspirations behind C#:

“We tried to stay much closer to C++ in our design [for C#]. C# borrows most of its operators, keywords, and statements directly from C++. We have also kept a number of language features that Java dropped, like enums.”


C# was developed for use within Microsoft's .NET development framework, which comprises a large library of prebuilt code classes (for things like data access, data connectivity, and network communications) and a software environment called the ‘Common Language Runtime’ (CLR). The CLR is a ‘just in time’ compiler, meaning it converts C# code into suitable machine code as it runs.


The framework actually supports a wide range of languages, including C++ and even Visual Basic, but C# has seen particularly wide use. As you might expect .NET is primarily designed for the Windows platform, although an open source project called Mono provides a runtime and development framework for Linux and Mac operating systems. As a result of .NET, C# is seen as a particularly strong language with which to develop Windows desktop applications.


The ECMA, which approved version 2.0 of C# (the current version is 5.0) as a standard independent of Microsoft, have stated seven key design goals for the language. These include but are not limited to the following:

  • C# is intended to be simple, modern, general purpose, and object-oriented
  • C# should support strong type checking, array bounds checking, and automatic garbage collection
  • C# is not intended to compete with C or assembly language for size (of compiled programs) or performance.


Advantages of C#

As Anders has publicly stated, C# tries to build on much that is good about the C++ and Java languages. C++ has been around since 1983, and is considered by many to be a fairly complex language to master, especially for those starting out in programming. It lacks many of the memory management features of modern languages, like automatic garbage collection (something both Java and C# support) which can make writing very efficient code difficult. C# does feature automatic garbage collection, meaning developers have more time to focus on solving problems with their code rather than implementing good memory management techniques. C# is also strongly typed, meaning it is somewhat easier for developers to adhere to coding best practice, and to find and eliminate bugs.


The dominance of C# on the Windows platform has seen a large and very active community build up around it, and this in turn has helped to foster numerous help and support resources. A quick search of the web will surface a wealth of well implemented, freely available code libraries and samples.


Areas for Improvement

At launch many felt C# was simply a Microsoft version of Java, developed to avoid explicitly licensing a third party product, but over time the two languages have diverged, and C# has found its own feet. It has moved away from its original platform independence, and become a core tool of the .NET framework.


The ‘just in time’ nature of its compiler has lead some developers to question its performance, when compared to other languages. Whilst there is some truth to this (ECMA themselves have stated C# isn’t a performance rival to the likes of C or pure machine code) it is not something that affects 99.99% of well written code running on modern hardware. Indeed the wide variety of code libraries available as part of the .NET framework means that many familiar problems already have efficient and fully tested solutions available.


The Future of C#

In April 2014, at its BUILD developer conference, Microsoft formally announced it was releasing the .NET C# compiler ‘Roslyn’ as an open source product. This was a big step for Microsoft, who had previously developed the .NET framework as proprietary technology. Roslyn is part of a larger initiative called the ‘.NET Foundation’ which aims to open source much more of .NET over time. Whilst it is early days for these initiatives, they are a positive move towards greater cross platform support for .NET, and the wider use of C# on non Windows devices (like smartphones and tablets).


Infragistics offers a number of development tools that make it even easier to write high quality C# code and applications. Find out more here.

Indigo Studio from a Developer Perspective

$
0
0

Click here to learn more about Indigo Studio

As a developer with nearly two decades of working in the trenches. I was skeptical the first time someone mentioned the term User Experience (UX). At the time I didn’t fully grasp the science and engineering involved with creating not just a good experience but a great one.  Like most developers I thought about the user interface from my point of view. I open the toolbox in Visual Studio and started grabbing the controls that made sense for the problem at hand. Never really considering or taking the time to understand what would make the best experience.

Over the last few years, I had the pleasure of working with some of the best and brightest UX minds in the world. In our Infragistics D3 service group we have two distinct teams: Development and User Experience.  During our projects there is a lot of collaboration that happens between these teams. Both groups bring unique prospective to designing and building the best user experience for our customers. We use a variety of techniques and tools during this collaboration including sketches, wireframes, visual design mockup and design guides. The main deliverable we collaborate over are wireframes. A wireframe can be in the form of a simple sketch to a high fidelity PDF document with lots of annotations. Wireframes have an inherent drawback that they are static in nature and don’t always clearly define the user experience.

This is where prototype and tools like Infragistics Indigo Studio shine. Indigo Studio is more than just a simple prototyping tool it a Swiss Army knife that allows you to capture and bring to life the user experience. From a developer point of view, this saves me time not just during the initial collaboration with our UX team but ongoing throughout the entire application development lifecycle. Instead of having to maul over a print out or a PDF document. It’s possible to fire up Indigo Studio and interactively walkthrough a real working prototype. This is a powerful thing that allows us to capture the user experience in a very rich way. Now when our teams are collaborating it much easier to clearly see what the user experience will be. Instead of having to wait weeks or even months for us (developers) to build out the UI of the application. Project stake holders and end users can walk through the same rich interactive prototype and validate how the application will work. This can be a huge time saver and simplify the overall developer effort and cost in building the application.

As a developer it’s easy to get caught up in the bits and bytes involved with a working application an overlook the importance of the user experience. Tools like Infragistics Indigo Studio are invaluable weapons that a developer can add to his arsenal to help capture and bring to life not just a good but a great user experience.

Infragistics World Tour: Europe Here We Come!

$
0
0

Infragistics is taking the show on the road and across the pond - to Europe! We'll be in London September 29th, Paris October 3rd, and Munich on October 7th! You don't want to miss these workshops, where you'll learn how to incorporate design into your development for apps that look good and provide a great user experience.

[youtube] width="640" height="480" src="http://www.youtube.com/embed/EVijDODTyhY" [/youtube]

Want to register? Email DaveM@infragistics.com to be notified when registration opens up for these events - and we hope to see you there!

iOS - Objective-C - Downloading Data using NSURLSession

$
0
0
Previously, I talked about downloading data using NSURLConnection . That method works great, however, in iOS 7 Apple introduced a different way of downloading data, which also allows downloading while you're app is in the background. Just like we did with NSURLConnection, we first need to implement a protocol. This protocol is called: NSURLSessionDownloadDelegate and requires the following 4 selectors: -(void)URLSession:(NSURLSession *)session downloadTask:(NSURLSessionDownloadTask *)downloadTask...(read more)

Great UX & How to Build It - An Interview with Jared Potter of Sixth Ave. Studios

$
0
0

After his recent World Tour stop at Microsoft in Times Square, NYC, we had the opportunity to chat with Jared Potter of Sixth Ave. Studios about design, development, and the best – and worst – user experience he’s seen lately. Read on!

Thanks for taking the time to sit down with us today, Jared. Why don’t you start by telling us a little bit about yourself?

Sure, thanks. I’m now the principal designer for Sixth Ave. Studios, but before that I was the design integration lead for Microsoft's mobile team and led the effort on the Windows Phone from 2009 to 2012, where I used a lot of tools.  When I was in the design studio I talked tools with a lot of teams, and I was in charge of a V-team that would choose the tools that we designed with and developed with. So that’s my background: I love talking about and trying out different tools.

So given your design background, why would you say design is so important?

Design is important because it's inevitable. Design will happen whether you're intentional about it or not. If you ignore it, you're going to end up with an awful end result. But if you’re intentional about the final experience that you want to produce from the moment you start working on your software, you’ll create a good design and a great experience for your users. Outside of the feature set, design is the one thing that relates directly to the customers.

Then what would you consider the number one most important design rule?

I would say that design is order. Giving your designs the appearance of simplicity is a very important thing. Creating a design that feels cluttered or overcrowded is probably the easiest way you can go wrong, with complex software and lots of user requirements. When it comes to designing software, I strive for simplicity by using grids, aligning objects, typography, things like that to create the perception of order. Of course, there are lots of other important design rules that I live by, but I'll go with that one for now! [laughs]

Why do you think it's so hard to build an app that looks good and provides a great user experience?

I think it's because building an app is all about empathy: how empathetic can you actually be with your users? A lot of times people will get really passionate about their designs, to the point where it becomes their baby. The problem is that the client wants a pony, and you want to keep your little baby that you've been working on, and those are two contradictory things.

The biggest thing that you can do to reconcile that is to craft the design for the user. Focus on UX, do user research, get your designs in front of people – whatever you can do to flex your empathy muscle will help you create a great app. Because you're not the user! Even if that was the case before you started this software, once you're creating it, you're no longer the user.

So you're on this World Tour with Infragistics, showing people how to use Indigo Studio to start designing a great app. How do you think it's going?

I think it's going very well! We’ve had some great turnouts, and I’m looking forward to heading to Europe in the fall.  That’s the magic of Dave Mendlen [my co-presenter on the World Tour]. I've been to a lot of talks where they write a lot of code on stage and people will ask their technical questions, but they were going to ask that technical question regardless of what you’re presenting. But Dave does a really good job of engaging with the audience. They come to the show, see what we’re talking about, and keep the conversation going long after the show.

So there’s more of a personal touch with these shows.

Right. Everything from the emails before the show to the Q&A afterwards onsite, it’s a very personal experience.

And from a technical standpoint, I definitely think that the message is getting out there with these shows too. Indigo Studio is a great, time-saving prototyping tool that every developer should have in their toolkit, and at every show I’ve found that people get really excited about it because it resonates with the work they're currently doing.

Speaking of something you can get excited about, here’s a fun question for you: what's the best and worst user experiences you've seen lately?

Oh, wow… the best one? That’s hard. I can think of a million bad ones [laughs]. Coming from the Windows team, I was one of the originators on the team that created the Metro design language. Hands down, some of the worst user experience I've seen has been coming out from Microsoft on the Windows side of things.

There are a lot of things that just make no sense. They kind of get the rules around the design, but they don't get the heart of the inspiration behind it. They're like, "You can make a box? I can make a box. You made a tile that’s a red square? I can do that too!" Then you'll just get pages of these tiles or boxes and it just doesn’t look pretty and it doesn't fit into the experience. I think that stems from the fact that these developers use the Microsoft guidelines as their bible. They’re super strict about it, and some of the designs are just unusable when you get them to users.

When it comes to great UX, I actually just discovered this app called "Clear", and it’s fantastic. It's a list/task-tracking app, but the simplicity of it lies in the fact that everything is done with an intuitive gesture. To add an event you just drag down, to mark a task as done you swipe one way and to delete it you swipe it the other way –  where so many of the task apps out there are overly complicated, this is a little app that just does everything that you want it to do, very simply. That’s great user experience!

To learn more about Infragistics Ultimate or download your free trial, click here.


MVVM Best Practices

$
0
0

In this episode, recorded at TechEd in Houston, Robert Green is joined by Brian Lagunas of Infragistics, who shares with us best practices for building applications using MVVM. Brian starts off by reviewing what MVVM is and what it isn't. He then demonstrates several things you should not do and why you should not do them. In addition to the demos, Brian gives his advice on how he approaches some common scenarios.

For more information on Visual Studio Toolbox see http://channel9.msdn.com/Shows/Visual-Studio-Toolbox 

[youtube] width="560" height="315" src="http://www.youtube.com/embed/ysWK4e2Mtco" [/youtube]

Optimize the UX of your applications with the Ignite UI jQuery Radial Menu

$
0
0

Ignite UI Radial Menu Header imageThe 14.1 release of Ignite UI came with a brand new OneNote MX Inspired jQuery Radial Menu control. This control presents its items in a circular arrangement around a center button and thus allows the end-user to select any item faster because each item is equally positioned in relation to the center. If you have been following my blogs so far you may have read the ones about the  XAML Radial Menu and the WinForms Radial Menu. With the release of this Web UI widget now you can create office inspired apps on every platform.

Essentials

From User experience point of view the Radial Menu strikes 10 out of 10 points when it comes to easy navigation through the different items. With its circular structure every slice is equally distant from the center which means that you can reach/select every one of them for the same duration and considerably faster compared to using a normal menu. The supported item types for this control are various and has unlimited levels of hierarchy. Among those types you can find numerical values, color values as well as buttons  that perform action.

As I said this control is inspired by the OneNote MX menu which means that it is intended to be a tool for text editing but of course it is flexible so you can customize it and use it according to your needs. We are going to take a look at some of the basics to help you get started with this widget effortlessly. Let’s start by saying that by default the Radial Menu has 8 items – meaning that the inner area is separated in 8 equal slides and if you need less items the other space will remain blank. Of course that doesn’t mean that you are obligated to make 8 wedges, you just have to change the value of the minWedgeCount property to the number of items you need. This option comes in handy when you create a numericgauge item because it allows the gauge to spread along the whole inner area of the sub-item.

If you want to create a numeric item you have to add an item of numericitem type which will act as a button to the numeric gauge. Visually the slice will contain a custom image or header if any and an associated numeric value above them. The child item should be of numericgauge type which will allow to select a numeric value.

JS:

  1. $("#radialMenu").igRadialMenu({
  2.     width: "300px",
  3.     height: "300px",
  4.     minWedgeCount: 1,
  5.     items:
  6.     [
  7.         {
  8.             type: "numericitem",
  9.             header: "Font Size",
  10.             iconUri: "/Icons/Size.png",
  11.             value: "8",
  12.             items:
  13.             [
  14.                 {
  15.                     name: "gauge1",
  16.                     type: "numericgauge",
  17.                     ticks: "10,12,18,24,36",
  18.                     value: 12,
  19.                     smallIncrement: 2,
  20.                     valueChanged: function (evt, ui) {
  21.                         if (evt.newValue == 10) setFontSize(2);
  22.                         elseif (evt.newValue == 12) setFontSize(3);
  23.                         elseif (evt.newValue == 18) setFontSize(5);
  24.                         elseif (evt.newValue == 24) setFontSize(6);
  25.                         elseif (evt.newValue == 36) setFontSize(7);
  26.                     }
  27.                 }
  28.             ]
  29.         }
  30.     ]
  31. });

MVC:

  1. @(
  2.     Html.Infragistics().RadialMenu()
  3.         .ID("radialMenu")
  4.         .Width("300px")
  5.         .Height("300px")
  6.         .MinWedgeCount(1)
  7.         .Items(i =>
  8.             {
  9.                 i.NumericItem("numItems1")
  10.                     .Header("Size")
  11.                     .IconUri("/Icons/Size.png")
  12.                     .Value(8)
  13.                     .Items(subItem => subItem.NumericGauge("numGauge1")                    
  14.                     .WedgeSpan(5)
  15.                     .Ticks(newdouble[] {8,9,10,11,12,13,14,16,18,20,22,24,26,28,36,48})
  16.                     .Value(8));
  17.             })
  18.         .Render()
  19.     )

Image:

Ignite UI Radial Menu Numeric Items

Another specific item type is the coloritem. When you add this item to the menu it will display custom image and header if any and an associated color. The child items should be of colorwell type. This item is specialized item that displays associated color in the item area and the outer ring.  To create the whole palette of colors you need to add a hierarchy of  color well children. The snippet below demonstrates how to do that for the yellow color.

JS:

  1. type: "coloritem",
  2.             header: "Foreground",
  3.             iconUri: "/Icons/FColor.png",
  4.             items:
  5.             [
  6.                 {
  7.                     type: "colorwell",
  8.                     color: "#FFFF00",
  9.                     autoRotateChildren: false,
  10.                     items:
  11.                     [
  12.                         {
  13.                             type: "colorwell",
  14.                             color: "#ffffe5"
  15.                         },
  16.                         {
  17.                             type: "colorwell",
  18.                             color: "#ffffcc"
  19.                         },
  20.                         {
  21.                             type: "colorwell",
  22.                             color: "#ffffb9"
  23.                         },
  24.                         {
  25.                             type: "colorwell",
  26.                             color: "#ffff99"
  27.                         },
  28.                         {
  29.                             type: "colorwell",
  30.                             color: "#ffff7f"
  31.                         },
  32.                         {
  33.                             type: "colorwell",
  34.                             color: "#ffff66"
  35.                         },
  36.                         {
  37.                             type: "colorwell",
  38.                             color: "#ffff4c"
  39.                         },
  40.                         {
  41.                             type: "colorwell",
  42.                             color: "#ffff32"
  43.                         },
  44.                         {
  45.                             type: "colorwell",
  46.                             color: "#ffff19"
  47.                         }
  48.                     ]
  49.                 },{...}
  50.          ]

MVC:

  1. i.ColorItem("colorItem1")
  2.                 .Header("Color")
  3.                 .IconUri("/Icons/BColor.png")
  4.                 .Items(si =>
  5.                 {
  6.                     si.ColorWell().Color("#FFFF00").Items(colorItem =>
  7.                     {
  8.                         colorItem.ColorWell().Color("#FFD55F");
  9.                         colorItem.ColorWell().Color("#FFEB9C");
  10.                         colorItem.ColorWell().Color("#FFFF00");
  11.                         colorItem.ColorWell().Color("#AC4D25");
  12.                         colorItem.ColorWell().Color("#D16227");
  13.                         colorItem.ColorWell().Color("#EB7C23");
  14.                         colorItem.ColorWell().Color("#F6901E");
  15.                         colorItem.ColorWell().Color("#FFC000");
  16.                     });
  17.                 });

Image:

Ignite UI Radial Menu Color Items

You can see from the images that in the outer ring above some of the items there are arrows – this is an indicator that these items have sub-items and you can navigate to them through those arrows. All items ( regardless if they have child items or not) act as simple buttons you can assign actions to through the click handler . For the items with hierarchical structure, each time a child item is used, its name is set on the parent's recentItem property. You can use that property to perform the same functionality the child item had from the parent, essentially functioning the same way as a split button would.

JS:

  1. $("#radialMenu").igRadialMenu({
  2.     width: "300px",
  3.     height: "300px",
  4.     minWedgeCount: 1,
  5.     items:
  6.     [
  7.         {
  8.             name: "bold",
  9.             header: "Bold",
  10.             iconUri: "/Icons/Bold.png",
  11.             click: function () { toggleBold(); }
  12.         }
  13.     ]
  14. });

MVC:

  1. @(
  2.     Html.Infragistics().RadialMenu()
  3.         .ID("radialMenu")
  4.         .Width("300px")
  5.         .Height("300px")
  6.         .MinWedgeCount(1)
  7.         .Items(i =>
  8.             {
  9.                 i.Item("button1")
  10.                     .Header("Bold")
  11.                     .IconUri("/Icons/Bold.png")
  12.                     .ClientEvents(newDictionary<string, string>() { { "click", "function(evt, ui) { alert('Bold clicked'); }" } });
  13.             })
  14.         .Render()
  15.     )

Image:

Radial Menu Bold button

The following snippet is an example how to make  a parent item act like a split button.

  1.     type: "list",
  2.     header: "Font",
  3.     highlightBrush: "#004A7F",
  4.     outerRingButtonFill: "#4C4C4C",
  5.     outerRingButtonHotTrackFill: "#66CCFF",
  6.     autoRotateChildren: false,
  7.     iconUri: "/Icons/Font.png",
  8.     click: function (evt, ui) {
  9.         setFontFamily(evt.item.recentItemName);
  10.     },
  11.     items:
  12.     [
  13.         {
  14.             header: "Arial",
  15.             name: "Arial",
  16.             highlightBrush: "#004A7F",
  17.             click: function (evt, ui) { setFontFamily(evt.item.name); }
  18.         },
  19.         {
  20.             header: "Calibri",
  21.             name: "Calibri",
  22.             highlightBrush: "#004A7F",
  23.             click: function (evt, ui) { setFontFamily(evt.item.name); }
  24.         },
  25.         {
  26.             header: "Comic Sans",
  27.             name: "Comic Sans MS",
  28.             highlightBrush: "#004A7F",
  29.             click: function (evt, ui) { setFontFamily(evt.item.name); }
  30.         },
  31.         {
  32.             header: "Consolas",
  33.             name: "Consolas",
  34.             highlightBrush: "#004A7F",
  35.             click: function (evt, ui) { setFontFamily(evt.item.name); }
  36.         },
  37.         {
  38.             header: "Courier New",
  39.             name: "Courier New",
  40.             highlightBrush: "#004A7F",
  41.             click: function (evt, ui) { setFontFamily(evt.item.name); }
  42.         },
  43.         {
  44.             header: "Segoe",
  45.             name: "Segoe UI",
  46.             highlightBrush: "#004A7F",
  47.             click: function (evt, ui) { setFontFamily(evt.item.name); }
  48.         },
  49.         {
  50.             header: "Tahoma",
  51.             name: "Tahoma",
  52.             highlightBrush: "#004A7F",
  53.             click: function (evt, ui) { setFontFamily(evt.item.name); }
  54.         },
  55.         {
  56.             header: "Times",
  57.             name: "Times New Roman",
  58.             highlightBrush: "#004A7F",
  59.             click: function (evt, ui) { setFontFamily(evt.item.name); }
  60.         },
  61.         {
  62.             header: "Verdana",
  63.             name: "Verdana",
  64.             highlightBrush: "#004A7F",
  65.             click: function (evt, ui) { setFontFamily(evt.item.name); }
  66.         }
  67.     ]
  68. }

Let’s get creative

The radial menu can be separated in three main parts – outer ring, inner area and center button. All of these parts can be easily customized by changing their brush, highlights, border and etc..  Let’s go over the options that are related to these parts and see how to manipulate and change the appearance of the control.

We are going to stat from inside out. The center button! The center button is the first thing you see when you run the control. Thanks to it you can expand or collapse the Radial Menu as well as navigate through the hierarchical levels of the different options (it allows access to menu items on the previous level). It has three main states: closed, open and when you interact with it. Each of there states is connected with two options one for the border stroke and one responsible for the internal fill color.

Ignite UI Radial Menu Customized Center Button

Let’s continue with the inner area. The inner area displays the current level menu items.  Similar to the center button this part of the menu has states, which means that you can change the appearance of the inner area when it is in a undisturbed condition and then you interact with one of the items. The outer edge of this inner area is called a selection arc and in this arc you can see the currently hovered menu item highlights and its checked state.

Ignite UI Radial Menu Customized Inner Area

The outer part of the radial menu is the Outer Ring. If there are arrows above the items in this part of the menu this means that these items have sub-items and you can navigate to them. As you have probably guessed similar to the above mentioned parts of the control you can manipulate the outer ring on few levels. You can change the appearance of the main ring as well as the appearance of the buttons on it. The supported option for customizing this ring are various and detailed. You can even customize the arrow on the the buttons.

Ignite UI Radial Menu Customized Outer Ring

Summary

The main idea behind the radial menu is to be simple and easy to work with. It should present small number of items and distribute them in a circular arrangement which speeds up items selection. It is designed to look and behave like OneNote’s radial menu but it allows you to customize it and adopt it to your needs. This colorful, functional and handy widget can undoubtedly optimize the user experience of your applications.

Check out a live demo on jsFiddle or download the ASP.NET MVC sample.

You can follow us on Twitter @Infragistics and stay in touch on Facebook, Google+ and LinkedIn!

Microsoft In Touch Conference–Event Recap

$
0
0

The event was held on Wednesday and Thursday , May 14th and 15th  at Sofia Event Center, Sofia, Bulgaria. Microsoft In Touch is the biggest Microsoft's conference for developers in Bulgaria. This is two-day event, including many presentations and workshops related to the latest technologies from Microsoft.

Infragistics was a bar sponsor of Microsoft In Touch . Company had a booth, company presentation two other technical presentations  and provided award for the event raffle.


What is Microsoft In Touch


  • A two days event
  • 32 presentations in 2 tracks.
  • Around 450 attendees
  • Speakers from 7 countries:
  • The biggest event for Microsoft developers technologies in Bulgaria


Infargistics participation at Microsoft In Touch


  1. Infragistics Inc. was a sponsor
  2. There was 3 technical presentations from Infragistics Inc.:


Microsoft In Touch keynote:


Infragistics booth:


Infragistics crew


Damyan and Marina are talking about Indigo Studio


Angel Todorov is talking about “Debugging, Profiling and Optimizing Web Apps with IE11 – F12 Dev tools”


Bobbi and Mihail are preparing their presentation about “Node.js and Open Source Software Development on Microsoft Azure”


Bobbi and Mihail in action


You can take a look at the video recording from “Node.js and Open Source Software Development on Microsoft Azure” here :

[youtube] width="560" height="315" src="http://www.youtube.com/embed/GSQ_4vuyMDY" [/youtube]


If you want more information about the event feel free to contact the Event Admins at mmateev@infragistics.com

Follow this event on Twitter with hash tag  #MSinTouch.

You can learn more about Azure Bootcamp Bulgaria if you follow us on Twitter @mihailmateev  and @Infragistics and stay in touch on Facebook, Google+, LinkedIn and Infragistics Friends User Group !

Infragistics Windows Forms Release Notes – May 2014: 13.1, 13.2, 14.1 Service Releases

$
0
0

With every release comes a set of release notes that reflects the state of resolved bugs and new additions from the previous release. You’ll find these notes useful to help determine the resolution of existing issues from a past release and as a means of determining where to test your applications when upgrading from one version to the next.

Release notes are available in both PDF and Excel formats. The PDF summarizes the changes to this release along with a listing of each item. The Excel sheet includes each change item and makes it easy for you to sort, filter and otherwise manipulate the data to your liking.

In order to download release notes, use the following links:

WinForms 2014 Volume 1 Service Release (Build 14.1.20141.2035)

PDF - Infragistics WinForms 2014 Volume 1
Excel - Infragistics WinForms 2014 Volume 1

WinForms 2013 Volume 2 Service Release (Build 13.2.20132.2054)

PDF - Infragistics WinForms 2013 Volume 2
Excel - Infragistics WinForms 2013 Volume 2

WinForms 2013 Volume 1 Service Release (Build 13.1.20131.2124)

PDF - Infragistics WinForms 2013 Volume 1
Excel - Infragistics WinForms 2013 Volume 1

Intro to the Mobile Web Using HTML5 and jQuery Mobile - World IA Day 2014

$
0
0

Back in March, Infragistics D3 Services hosted its second annual World IA Day event at our Cranbury, NJ headquarters. This annual event, which took place in cities around the world, highlighted the roles of UX, interaction design, development and sales in information architecture and user experience design.

Todd Snyder, Principal Consultant with D3 presented an Intro to the Mobile Web Using HTML5 and jQuery Mobile. Check out his full presentation below:

[youtube] width="640" height="360" src="http://www.youtube.com/embed/BKUulAzXgwo" [/youtube]

For more videos like this one, be sure to subscribe to our YouTube channel!

Viewing all 2460 articles
Browse latest View live